Wednesday, May 30, 2012

Stained Glass, Exhibit D

(Does exhibit really have an "h" in it?  Bizzare.)

Anywho, I am getting near the end of my stained glass project!  It's been fun, and I really don't want it to end.  But I am also glad this last class is over.  It gave me major hand cramps that lasted until well into the next day.  The good news is, I am done with all my foiling (see below).  The bad news is I didn't get to start soldering, so there aren't any fun stories about third degree burns.  Darn. 

(Does soldering really have an "l" in it?  Seriously, who decided these spellings?)

Before I get going on a tangent about the nonsensical spellings of the English language, let me run you past how my hand cramp class went...

Step 1: I finished all my cutting and grinding last week and got everything laid out. I had hoped to start soldering this week, but I completely forgot about the step in between: foiling.  Each piece of glass must be wrapped in a sticky, thin tape made of copper foil.  The foil will give the solder something to melt onto so the pieces stick together.  So the entire night this week was spent foiling my glass.  That's it.  Step 1. That's all there was.

I'll break it down for you a little bit, though, so you can see how foiling works.

Part 1 of Step 1:  Gather the tools.  Tools for this week included a roll of 7/16" copper foil with a black back (I guess there are different colors on the back of the foil tape which affect your final product in some way I could not discern from the description the teacher gave me.), a FID (yes, that's its actual name, and it might be my new favorite word.  I am certainly going to remember it for scrabble.), and a tiny pair of scissors. 

Part 2 of Step 1:  Windex and wipe off all the white residue from the edges of the glass that was created by grinding it.  The tape won't stick if the glass has residue on it.  I probably should have worn gloves for this step because I kept forgetting that running your finger along the edges of glass might not be wise.  The cloth wasn't enough of a barrier, evidently, and I ended up with quite a few neat little slashes on my finger tips.  Not as impressive as third degree solder burns, I know, but at least it's something.


Part 3 of Step 1:  Line up the edge of the glass piece right in center of the tape.  This requires a lot of contorting of ones head side to side and going cross-eyed, trying to figure out exactly where the center is and making sure the tape doesn't go on crooked.

Part 4 of Step 1:  Wrap the entire piece in tape then cut the tape (or rip it since picking up the scissors was entirely too much effort).


Part 5 of Step 1:  Now use the fid to smooth down the tape onto the edge, and the flat front and back, of the glass piece.  You have to rub quite hard and make sure it sticks in the dips and ripples.  Although you'd think this becomes monotonous, wrapping and smoothing the tape on piece after piece of glass, I found it very soothing and catharctic.  However, you have to grasp this tiny pencil-like fid quite firmly and exhert quite a lot of pressure, and after a while my knuckles got sore and I got a hand cramp in that meaty part of my palm.  I can still feel it 2 days later. 

(Does exhert have an "h" too?  What the heck?!)


Here's how it looks all foiled:


And now for an entire discourse on the absurdity of the English language, starting with the word "trough" ......

Friday, May 18, 2012

Stained Glass, Exhibit C

This week at stained glass, it was a lot more of the same--tracing, cutting, grinding, more grinding, and recutting. Only a lot less recutting, thank goodness. I think I only had to recut one piece! And the others went so much faster. I figured out how to cut closer to the inside of the marker line so as not to have to grind down as much. I found a better grinder that was faster. And I just overall didn't suck quite as much. I also got to learn how to use a few new tools/techniques.

Here's how it went down...

Step 1: Start tracing and cutting.  I tried out a different model of glass cutter today and liked it way better. It has a wide grip, like a gun instead of a skinny one, like a pencil.  That way you can exert downward pressure with your whole hand instead of just the tips of your fingers.  Way easier and more accurate.  Yay!


Step 2: Grind some more.  I had a few background pieces I had cut that were way too big for some reason, so I had quite a bit of grinding to do.  Fortunately, I found a better grinder so it took less time.

Step 3: Search for glass.  I decided to change my design a little bit.  I had planned on using a bright red to make the little squares around the border of my sun design and use white for the long pieces of the border.  But when I laid it out, it was very blah.  So I swapped where the red and white would go.  However, there was a slight problem:  I could only find tiny scraps of red in the glass bins.  Nothing big enough for the long edge pieces, let alone the center sun piece.  And they were quite a dark red, like red wine.  I needed something brighter.  So my great teacher, LuJean, found a big panel of bubbly red glass that had been taken from an old building upon restoring it.  It was perfect!  It was transparent, had texture, and was just the right shade of red.

(Isn't it pretty?  It looks almost orangey, like fire embers, with the light shining through.  But from straight on, it just looks like a nice strawberry red.)

Step 4: Learn a new tool!  I got to the part of my design where there were a lot of long rectangular pieces and small square pieces, all straight lines. So I got to learn how to use the straight-line cutting thingy. It slides along a rod that is fixed to the table so it makes a perfectly straight cut. Once you use it on 2 sides of your glass, you have a right angle and all the other pieces can be cut off with the straight-line cutting thingy. It was very handy and saved a lot of time on cutting and grinding. 


Step 5:  Another new tool!  Once I got all the long strips cut, I had to make them the right length.  So I used this straight-line measuring thingy and a cutter to give them a perfectly flat, square end.  I marked the glass with a template, lined it up against the straight-edged lip of this tool, and trimmed along the other straight edge.  Voila!  Perfectly square!


Step 6: Progress!  I managed to get all my glass pieces cut!  (I accidentally wisely chose a design with very few curved lines and not very many pieces. Some of my poor classmates will be cutting little crescent shapes and arches until winter.)  So the last thing I did was piece it all together, see if any pieces were too big and would nudge the ones next to them, and grind down the offending edges.

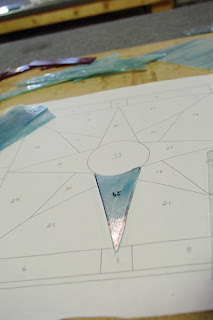
Here is a sneak peak of what the finished piece will look like...


Next week:  Fun with 3rd degree burns! (Also known as, I get to start soldering).


.

Sunday, May 13, 2012

Somebody is One Year Old!

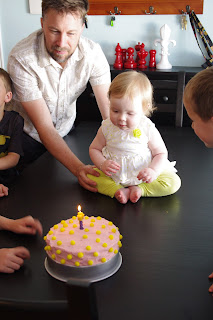
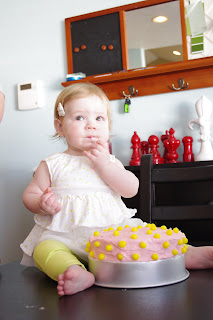
Today was Mother's Day.  It was also Pippa's 1st birthday.  What a great way to celebrate being a mother--by sharing it with your sweet baby girl.


The Cake...


The Birthday Girl...


The Presents...


The Mess....


And The Aftermath...


It was perfect.
Happy Birthday, My Little Angel.

Friday, May 11, 2012

Stained Glass, Exibit B

This week's stained glass was a testament to my high level of determination.  Because...lets just say there was a big learning curve.   Last week, you may remember, we chose our design, picked out the glass we wanted to use, and cut the design sections out like pieces of a puzzle.  This week we went to work cutting the piece out.  Although I have cut stained glass before, it was a long time ago, probably 12 years ago.  Evidently I didn't retain ANY of that knowledge because I screwed up on at least my first 7-8 tries last night.  It's a lot harder than it looks!  Especially cutting curves with points on them (as in the rays of the sun surrounding the big round piece in the center of my design).  I kept accidentally clipping the tips off.  Or grinding them too far down.  But I'm getting ahead of myself.  Let me walk you through the fun:

Step 1: Get out your board where you laid out your design and glass pieces.  Try to remember which pieces of glass you had intended to go where. 


Step 2: Find all the instruments you'll need.  You know, that cutting thingy, and that plier thingy, and that other plier thingy, and that brush thingy.  (All technical terms I memorized from last week.) Oh, and a Sharpie.


Step 3:  Lay a paper puzzle piece on the glass and trace it with the Sharpie.


Step 4:  Start cutting the curve at the top. 
Step 5: Use the smaller plier thingy to break off the curved piece.
Step 6: Repeat steps 3, 4 & 5 since the first attempt ended in little tiny shards.
Step 7: Repeat steps 3, 4 & 5 since the second attempt ended in a snapped off tip.
Step 8: Repeat steps 3, 4 & 5 since the third attempt wouldn't come off at all.
Step 9:  Go find some new glass since you used up all the pieces you had.
Step 10: Start cutting (again).
Step 11: Go find the teacher to show you how to do it since you just ruined another piece.
Step 12: Success!  You finally got the curved piece off!  Now try the straight cuts down the sides.
(These are not my hands, by the way.  But seeing as how I couldn't photograph my own hands, thank you to whoever posted this picture on Google images!)

Step 13: The straight cuts are easier, but not a guaranteed success.  Take it slow, push down hard, keep your eye on where you're headed so you don't...oops, you just cut into the piece.  Start over!
Step 14: Use those bigger plier thingies to snap off the excess glass.
 

Step 15: It's a miracle!  You finished one whole triangle of glass in the last half hour!  Now lay it out against the design and see if it fits. 


Step 16.  It doesn't fit.  It's too long.  So go grind it down to size on the glass grinding thingy.


Step 17: Try a new piece of glass since you just ground down the tip too far.
Step 18: Honestly!  This is way harder than it looks!  But if you finally managed to grind down your 10th attempt properly, good for you.  Now do it all over again with the next 32 sections of glass.

So that pretty much sums up my evening.  A lot of cutting and a recutting until I got the technique down.  A LOT of close up grinding down of edges, hunched over the grinder.  Then walking back and forth to my design to see if the pieces fit.  Then cleaning off the marker and starting the next piece.  But I feel like I finally got a good rhythm, and next week will go way faster.

Here's how pathetically far I got this week:


Friday, May 4, 2012

Stained Glass, Exhibit A

In case you're not an avid reader of my one post a month, I've just started taking a stained glass class.  It's at Holdman Studios, an art center at Thanksgiving Point run by my sort-of/obscurely related through marriage/twice removed not-quite-a-relative Tommy Holdman, a super talented local stained glass artist.   Last night was my first glass, uh, class.  Here's how it went down...


Step 1) Choose a design.  I'm not into those flowery Victorian designs, which were most plentiful in the stack of options.  I'm more into the clean lines of the Arts and Crafts movement.  This was the closest design they offered us novices:


Step 2) Number all the pieces on your design on the giant light table.  Giant light tables = cool.


Step 3) Choose your glass.  This was the hardest part.  It's really the only creative part of the process.  Well, so far.  It's the most important because you could finish and decide your window looks stupid.  What would you do then?  Smash it and start over, of course.  So choosing my glass was stressful.  Also because you have to handle glass.  Glass, in case you don't know, is sharp.  You shouldn't, say, reach into a bin of glass scraps to see what's at the bottom without using the rubber-coated safety gloves the teacher instructed you not to forget to wear.  But hey, glass cuts are clean cuts, right?  So they should heal up fine.  In the end I decided to go with colors that would match my eat-in kitchen, where I'm most likely to hang my window.  My kitchen is a robin's egg blue and red and white.  So here are the glass pieces I chose:


(That dark one is actually a bright red. It just looks black.)

Step 4) Trace your design onto really hard-to-cut paper.

Step 5) Give yourself a hand-cramp cutting out all the pieces of your design from said paper.  You have to cut on either side of your pencil mark, making each puzzle piece slightly smaller than your paper design.  It's a LOT of cutting.  I needed a Coke something awful half-way through.  But the cramps helped stopped the bleeding, which is a good thing, right?


That's as far as I got last night.  Next week I think we will get the chance to seriously slice ourselves as we cut the glass.  Stay tuned!

Thursday, May 3, 2012

iLearn - Adventures in Stained Glass

I have realized lately about myself that I'm not generally crafty, creative, or artistic. Don't argue, Mom. It's true. Drawing mermaids really well when you're 10 doesn't mean you're artistic. I don't have the overwhelming desire to make everything around me beautiful. I wish I did. I totally admire people who do. I'm pretty freaking jealous of a lot of my friends' adorable seasonal items, their knack for finding amazing things at thrift stores that I never notice or never think of using in my decor even if I do notice them, their ability to make cute things out of everyday household items, the way everything in their houses seems deliberate, like they PLANNED OUT their decor or something wild like that. No, this is not where my talents lie. I appreciate but cannot create this type of artistry. I am far too pragmatic to be truly artistic or original. If it isn't practical, I can't get myself to do it. The only creative projects I take on, the only hobbies I undertake which can be considered artistic or crafty, are those which also have a purpose. Like soap. I had a good run of 4-5 years there where I got really into making soap. Because soap, if you don't know, also has the purpose of making your hands really dried out. See? Pragmatic. I have also made little decoupaged flower pots for growing herbs (post on that to come as soon as my sister takes pictures of them!). I sewed some little birds for my baby's room, but only because she had a blank wall that needed to be filled. Anyway, you get the idea. Beauty for beauty's sake? No. Beauty with function? Possibly.

So I have come to accept in my life that I will never be a great photographer, a painter, a ballerina, a chef, an opera singer, a ballroom dancer, or any of the other great artistic things I have at some time aspired to. I am, alas, a Jane-of-all-trades, mistress of none. I dabble in just about everything--languages, cooking, gardening, writing, dance, travel, yoga, cello, piano, singing, baking, photography, etc. but I am not amazing at any of them. I think my talent is not in the thing to be learned, but in the love of learning. And I learn well. Well and fast. I understand things quickly (not math). I'm a great test taker. I can remember long strings of numbers. I imitate accents well. I can remember useless facts. I adapt easily to different situations. I can watch the National Geographic Channel for hours without getting bored. I'm fearless about trying new things. I love all people. Those are all very handy, but not something you can show off at parties or collect trophies for. But that's who I am, that is where my talent really lies...in loving, embracing, soaking up learning.

My newest adventure in learning? Stained glass. You might say that stained glass is not a pragmatic craft. And you might be right. It certainly isn't trendy. But I've always loved glass--the way the light comes through it, the way it twists and bends images. The variations in the thickness. The smoothness. The way it amplifies light. The sparkle. A few years ago I had a roommate who created stained glass objects for a living--ornaments, garden stakes, mobiles, etc. She paid me to do some of the legwork, like cutting the glass and putting the copper foil on. But I never got to MAKE anything, to put it all together. So now, years later, I'm taking the opportunity to learn that final process. Stay tuned and I'll do a few blog posts walking my readers through the process. No, it may not be an apothecary jar full of hand-made marshmallow starfish, or an antique dresser with with just the right amount of paint peeling off and adorable pulls made out of hand-pounded railroad nails that I found at a swap meet for $12, or cupcakes with crushed Oreos and fondant tops that look exactly like spring tulips emerging from the dirt. But it will be my sort of art...and maybe you'll like it.